Contact Mysa Support logo

All articles

Shared AccessUpdated a month ago

A new way to share your thermostat!

The Mysa App now features Shared Access, a dynamic new capability that allows you to extend control over your Mysa thermostats to friends, family, or anyone you choose. This functionality is ideal for anyone looking to provide others with the ability to adjust their living space's temperature, whether it's for children in their bedrooms or tenants in a basement apartment.

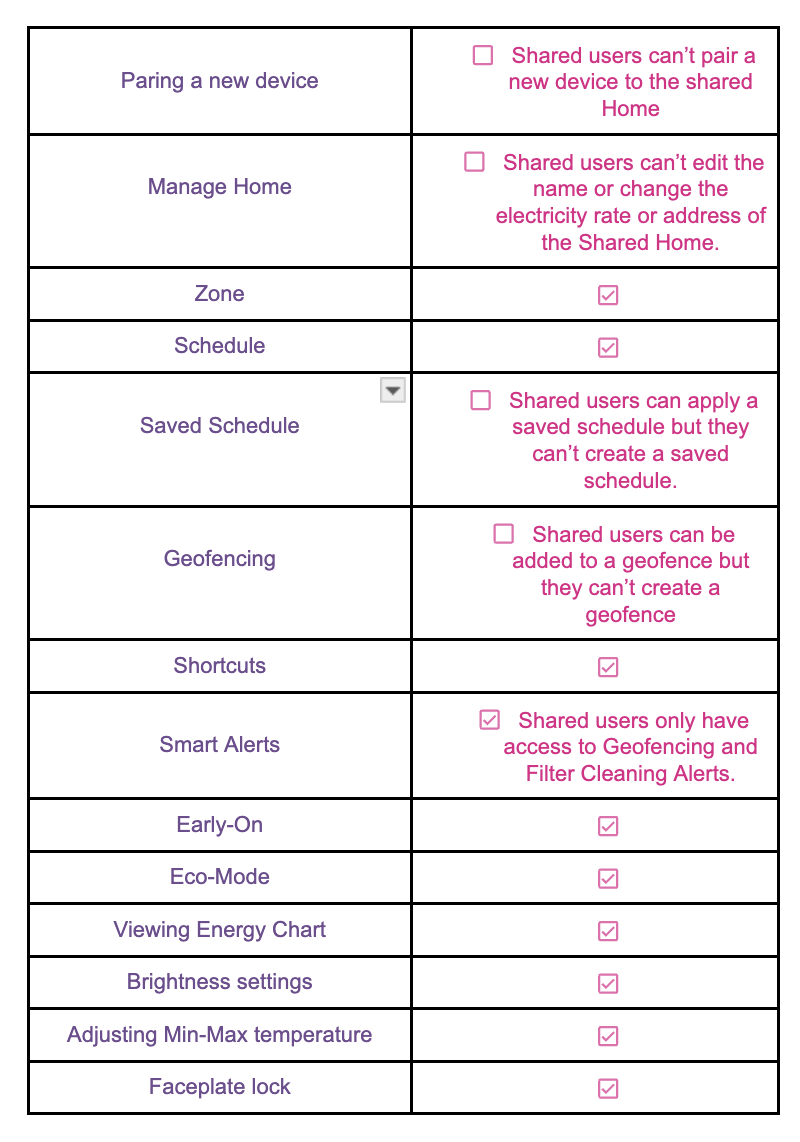
What settings can shared users change?

Users that you choose to share access with have the ability to adjust the following settings for the devices shared with them:


Adding someone to share access


To do this simply follow the steps below:

  1. Select Manage Mysa Homes in the Navigation Menu

  2. Select your Home if there is Multiple.

  3. Select Share Access.

  4. Tap on the add a share icon.

  5. Add the user’s information (name and email).

User Acceptance Process

  • Email Notification: Once you send an invite for Share Access, the invitee receives an email with the details.
  • Account Creation or Notification:If the invitee doesn't have a Mysa account, they'll receive an email with a temporary password to create one. Existing account holders get a direct notification in the Mysa App. 
  • Access Granting: Following the email instructions or app notification, the user gains access to the shared thermostats. They then select the devices shared with them.


Updating Shared User Access

Flexible Management: Changes to users' access can be made anytime, ensuring that control over thermostat settings remains aligned with your current needs.

Adding or Removing Devices with Shared Account


To do this simply follow the steps below:

  1. Select Manage Mysa Homes in the Navigation Menu

  2. Select your Home if there is Multiple.

  3. Select Share Access.

  4. Tap into the account you wish to make changes.

  5. A list of all the thermostats they currently have access to, filled in Purple.

  6. Tap to either grant them access to new thermostats or remove them. Units with access will be filled purple and units without access will be left white.

  7. When you have completed updating the user's selection, select Update Share and a loading image will appear briefly followed by a confirmation the device has successfully updated the shared user.

Additional Features and Notes

  • Status and Updates: You're able to check the status of shared access, update which thermostats a user can control, and cancel access as needed, even while waiting for the user to accept the initial share.

  • Thermostat Addition by Shared Users: If a shared user adds a thermostat, it will temporarily appear in their account then vanish. The primary user must update the share status for that thermostat for it to reappear in the shared user’s account.


Managing Pending Shared Users in Mysa

To monitor and update pending shared access requests for your Mysa thermostats:

  1. Open the Mysa App: Start by launching the app on your device.
  2. Go to Shared Access: Navigate to the "Shared Access" section within the app.
  3. Review Pending Shares: In this area, you'll see a list of all shared users, with any outstanding shares clearly marked as "Pending."


Selecting a Pending Share will give you access to:

  1. Delete Invite

    • Selecting this option will stop this user from ever gaining shared access.

  2. Update Share

    • With this you can adjust the thermostats you would like to give this user access to.

  3. Resend Invite

    • If the user has not received an invite or accidentally deletes their email you can resend it from here.


Removing Shared User


To do this, simply follow the steps below

  1. Navigating to Shared Access (Users)

  2. Selecting the user you wish to remove

  3. And tapping Remove Access

  4. Simply confirm your selection and you will have removed the user from Shared Access


Having issues? Take a look at our Shared Access troubleshooting page.

Was this article helpful?
Yes
No