Mysa for Central HVAC Installation GuideUpdated 5 days ago
Installing Your Mysa for Central HVAC
Overview & Step-by-Step Installation Guide
This guide walks you through installing, wiring, and powering your Mysa for Central HVAC Smart Thermostat. Whether you’re a confident DIY homeowner or working with a professional, this article provides a clear path from preparation to power-up.
Before You Begin
If you haven’t reviewed your wiring plan or terminal meanings yet, start with the wiring reference content below. This helps ensure you understand your wires before physically connecting anything.
Step 1 — Safety First
Before touching any thermostat wires:
Turn off power to your HVAC system at the breaker or disconnect switch.
Use a voltmeter or multimeter to confirm no voltage is present.
Take a clear photo of your existing thermostat wiring before removing anything.
This protects both your HVAC system and your new thermostat.
Graphic Placeholder — Safety Reminder
Caption: “Always turn off power before wiring.”
Step 2 — Remove Your Old Thermostat
Gently pull the old thermostat off its wall mount.
Photograph your wiring while the wires are still connected.
Label each wire with the included wire tags.
Prevent wires from falling back into the wall by taping them or looping around a pencil.
Step 3 — Mount the Mysa Wall Plate
Hold the Mysa Wall Plate against the wall using the built-in bubble level.
Mark screw locations.
Install wall anchors if needed.
Pull thermostat wires through the center opening.
Secure the wall plate with the provided screws.
Step 4 — Connect Wires to Mysa (Hands-On Wiring)
Use your wiring photo and the terminal labels to connect each wire to the correct terminal on the Mysa wall plate.
Insert each wire fully and ensure it is secure.
Keep exposed copper under ¼ inch to prevent shorts.
If you need help identifying wires, see the wiring reference table below.
RC ↔ RH Switch
Mysa does not use jumpers. Instead, it uses a built-in switch:
Single transformer (one R wire): Leave switch in the default closed position.
Dual transformer (separate heating/cooling R wires): Move switch to the open position
If You Don’t Have a C-Wire
Mysa for Central HVAC requires a C-wire for continuous power. If your thermostat wiring does not include one:
Use a spare unused wire (if available)
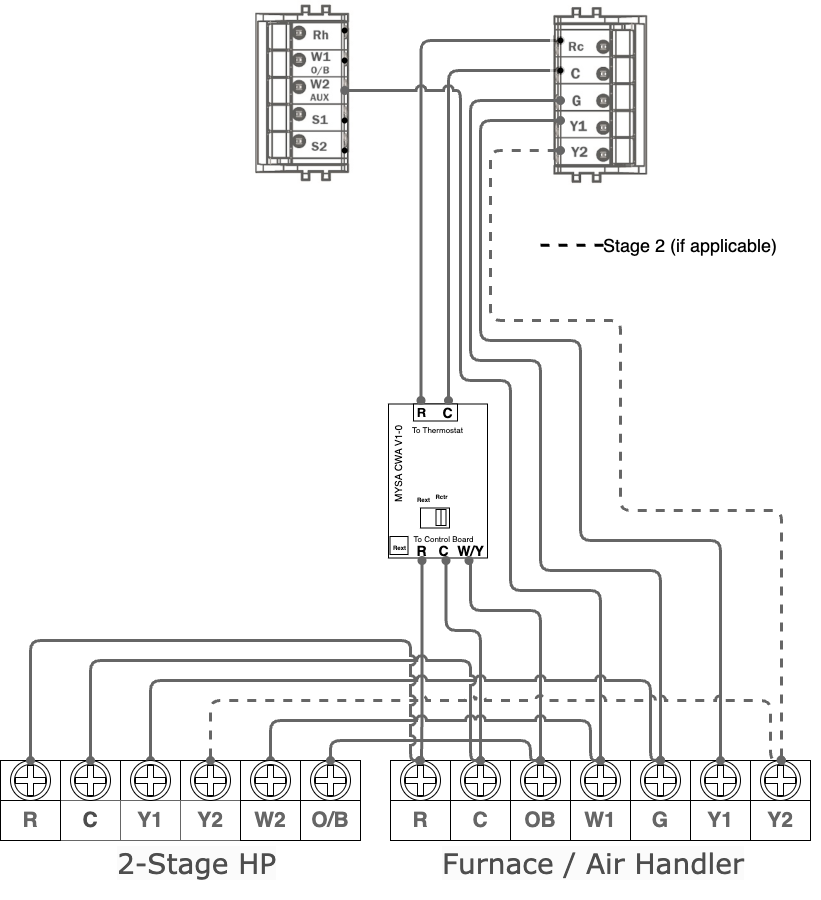
Install the Mysa C-Wire Adapter (CWA)
Consult an HVAC technician if unsure
Link: Understanding Your C-Wire (and the Mysa C-Wire Adapter)
Wiring Diagrams — Quick Reference Table
Use these diagrams to verify or plan your wiring before installation.
For physical wiring steps, continue with this article.
Select your system below:
| System Type | Common Terminals |
| Single-Transformer (Heat / Cool Only) without a C-Wire | Rh/Rc, W |
| Single / Two-Stage Heating or Cooling (2H/2C) with a C-Wire Single / Two-Stage Heating or Cooling (2H/2C) without a C-Wire | R, C, W1, W2, Y1, Y2, G |
| Heat Pump System (O/B) with a C-Wire Heat Pump System (O/B) without a C-Wire | R, C, Y (Y2), O/B, G, (W2/AUX) |
| Dual-Transformer Systems | |
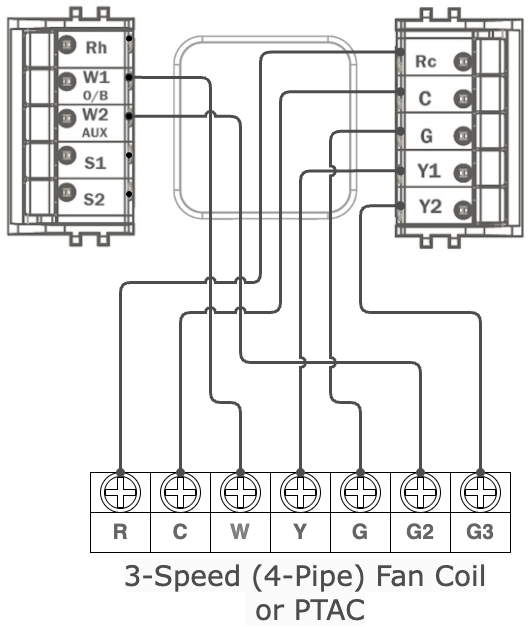
| Fan Coil / PTAC Systems (Multi-Speed Fan) | Unique terminals: G(G1), G2, G3 |
If you are missing a C-wire, you may need the Mysa C-Wire Adapter.
Single-Transformer System (Heat / Cool Only)
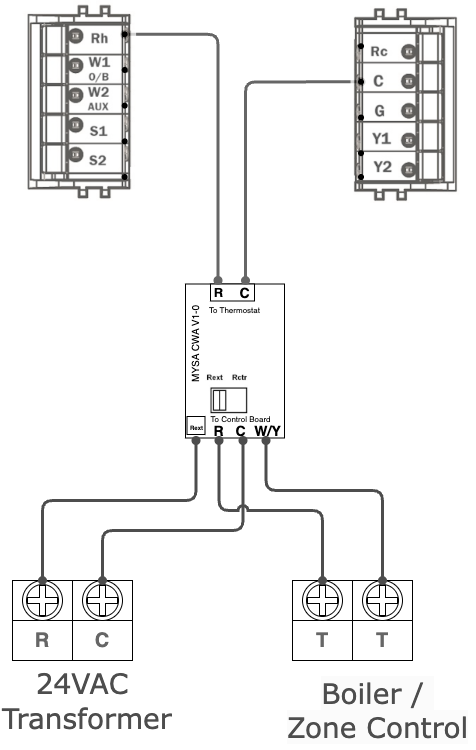
Furnace / Boiler:
Furnace / Boiler T&T Terminals
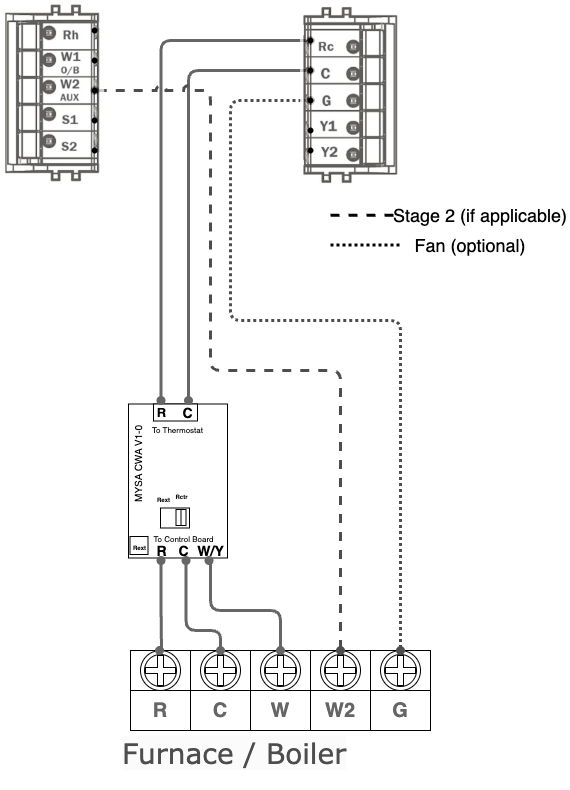
Single or Two-Stage Heating or Cooling
Connections:
R, C, W1, W2, Y1, Y2, G
Existing C-Wire
Mysa C-Wire Installation

Single or Two-Stage Heat Pump System (O/B)
Connections:
R, C, Y, O/B, G, W/AUX
Existing C-Wire
Mysa C-Wire Installation
Dual-Transformer Systems
If your system has separate transformers for heating and cooling:
⚠ Do not connect commons (C wires) between transformers.
Use an isolation relay or consult a professional.
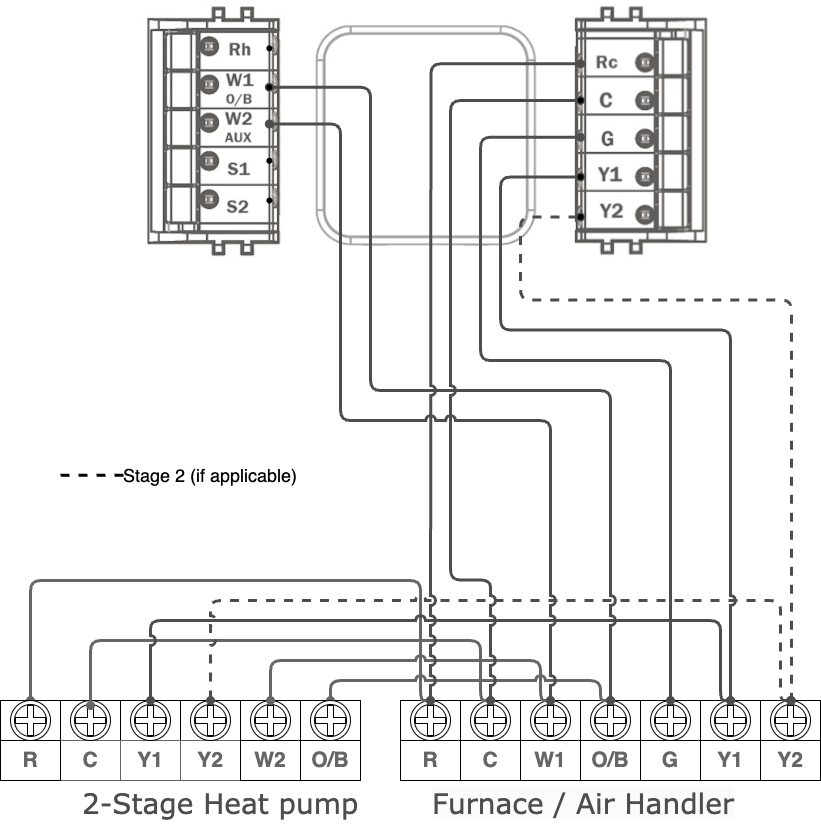
Two Transformer Heat Pump + Boiler + Isolation Relay
![]()
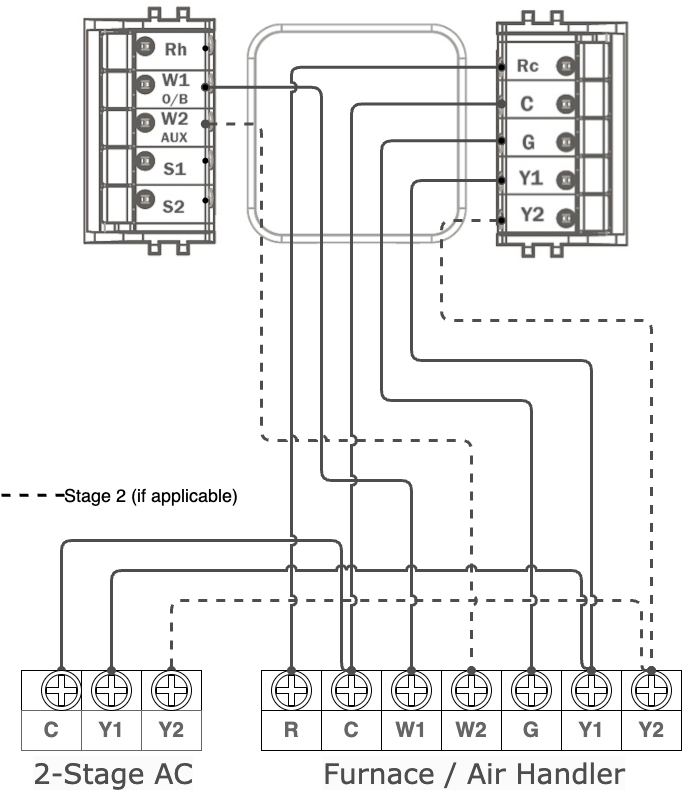
Two Transformer AC + Boiler
![]()
Fan Coil / PTAC Systems (Multi-Speed Fans)
Step 5 — Attach the Thermostat and Restore Power
Align the main Mysa display with the mounted wall plate.
Press to snap it into place.
Ensure no wires are pinched behind the display.
Close your furnace or air-handler blower door fully (interlock must engage).
Restore power at the breaker.
If Mysa does not power on, the furnace blower-door panel is the most common cause.
Step 6 — Verify Power-Up
After power is restored:
The display should light up within a few seconds.
You should see the Mysa smile, then the Bluetooth pairing symbol.
The thermostat is now ready for configuration and pairing.
If the display remains off, double-check the following:
Breaker is on
Blower-door switch is closed
RC/RH switch is in the correct position
C-wire is firmly connected
Furnace control board fuse (3–5 A) is intact
Use a voltmeter to confirm 24 V AC between R and C.
Step 7 — Troubleshooting (If Needed)
| Issue | Quick Fix |
|---|---|
| Furnace door not latched | Reattach lower blower-door panel |
| Loose wire | Reseat and secure |
| RC/RH switch incorrect | Move switch to correct position |
| Blown fuse | Replace with identical 3–5 A fuse |
If the thermostat still does not power up, contact Mysa Support or an HVAC professional.
Step 8 — Pairing and Configuration
Once powered on:
Open the Mysa app and select Add Mysa.
Follow the guided Bluetooth pairing steps.
Connect Mysa to your home Wi-Fi network.
Enter your HVAC configuration code when prompted (required).
The Mysa app will complete setup and guide you through basic settings and system testing.
Next Steps
Wiring Your Mysa for Central HVAC Thermostat
Mounting and Powering Up
Configuring Your Mysa for Central HVAC
Pairing Your Mysa with the Mysa App